WordPress Super Cache plugin, use browser cache. How to set up wordpress caching? clear cache from wordpress page
The Importance of Caching in WordPress
5 (100%) 1WordPress optimization - buffering and compression in 5 minutes.
You already know that page speed is important both for its position in search results and for the satisfaction of users who are more likely to return to fast websites. The download speed depends primarily on the size of the service and should be as low as possible. This will make it easier to cope with the growth of the site's popularity, after all, the higher the load on the server and links, the more it will cost to launch it.
Best Page Caching Plugin: WP Super Cache
The easiest and at the same time very effective way to reduce the weight of a site built with WordPress is to find a ready-made free and best WordPress caching plugin in 2019 - WP SuperCache. Its task is to compress the displayed page view and save it on the server in the so-called. page buffer (cache). If the page content doesn't change, users will get this compressed view loaded much faster. It will also reduce the load on the server, since it doesn't require a lot of PHP code to properly configure the cache view, for example, to serve a normal WordPress website.
After installing the WP Super Cache plugin from the WordPress repository and activating it, go to the settings in the cockpit (Settings > WP Super Cache). In the Caching option that is displayed, select the Caching Enabled option, then click Refresh State.
Now go to the "Simple" tab. This is where you set the options that will make WP Super Cache work more efficiently. Here's what to include:
Don't forget to enable caching on the site in the WP Super Cache plugin settings
Setting up WordPress caching
Below you will find additional settings for the WP Super Cache caching plugin.
Caching enabled - thanks to this, information about the site will be saved, which will speed up the service of the most popular sites.
Use PHP to serve cache files - will be used to serve compressed pages by the PHP interpreter. However, ask your hosting provider if it would be better to use the mod_rewrite method here.
Compressing pages so that they are served faster by visitors - static pages will also be compressed, not just posts. Some servers may have problems with this, if so just disable this option.
304 Unmodified browser caching. Indicates when the last modification of the page will be saved, and if it is not, the page will be compressed again.
If you are working on the site, for example, working on its appearance, you should also select the Do not cache pages for known users check box. Registered users (including the administrator) will receive current and non-cached versions of pages so that they can see changes on a regular basis.
After configuring these options (which are just the tip of the iceberg, the WP Super Cache configuration options are much larger), click the Update State button. All you need to do is reload the page (preferably in incognito browser mode) and you will see how much faster it works.
WP Smush plugin for optimizing WordPress images
The second important operation that you should do to reduce the weight of the page is to optimize the images for the WordPress site, you need to reduce the size of the uploaded images. This is a serious problem, because today even photos taken with a mobile phone have many megabytes. Photo galleries quickly become very heavy. Of course, you can reduce photos manually using a photo editor or photo management software, but this is time consuming and cumbersome when there are many photos. It would be better if WordPress properly compresses uploaded photos without losing their quality.

WP Smush plugin can automatically optimize uploaded images for WordPress site
A very good plugin for this purpose is WP Smush - Image Optimization. It will compile all the .jpeg, .png and .gif graphics you upload to WordPress. It works automatically, but you will see its configuration and menu in the cockpit as well (Media > WP Smush). The maximum size for a compressed image is 8MB, while you can add up to 32MB by selecting the Send new server to server option.
In the plugin settings you have the following options:

WP Smush plugin settings to optimize wordpress images
Automatically Erase My Images on Upload - Allows you to automatically compress photos uploaded to your WordPress media library (and enabled by default)
Saving image EXIF data - saving information (metadata) about the image. This is usually disabled, but if you're making a gallery of your photos, you can enable it to save EXIF data.
Resize Original Images - If you have original photos elsewhere, you can enable this option to save a lot of space. Only compressed files will be stored on the server. After enabling, you need to set the maximum possible image size (width and height) in pixels, they will be increased before being added to the library.
WP Smush has its paid Pro version. It provides additional options, allows you to compress large files and do it more efficiently. If you create pages with photo galleries, buying one might be a very good idea.
This is just the beginning of the optimization that is waiting for you to get a super-fast WordPress site. However, you have already taken the most important steps and if you check the results of your website in the testing tools, you will see a significant improvement.
In continuation of this article, we have prepared for you.
Good afternoon! This tutorial will show you how to install and work with the plugin WP SuperCache in order to improve site performance.
Check the box ‘ The cache refers to this site for quick access‘ (Cache hits to this website for quick access) and use mod_rewrite to provide cache files using the setting available below. Then, update the status using the corresponding button.
Scroll down the page, you will see the mod_rewrite rules that need to be added. Click on the ‘ Update Mod_Rewrite Rules‘ (Update Mod_Rewrite Rules) to update these rules. After updating the mod_rewrite rules, you will see that this section is green.
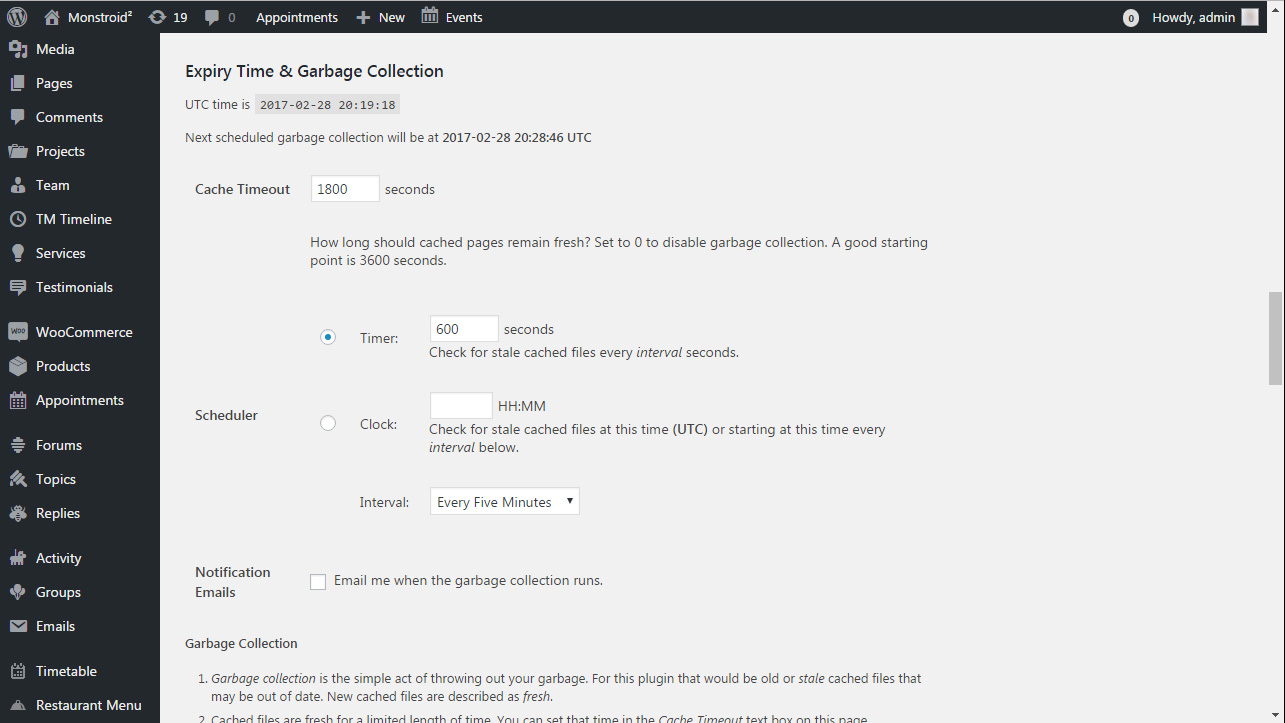
To get rid of the garbage collection notification, scroll down the advanced settings page to the section Expiration Time and Garbage Collection(Expiry Time & Garbage Collection) and set the time and frequency of garbage collection of cached files on your server.
You can also enable file compression by checking the box next to ‘ Compress pages so that users get them faster‘(Compress pages so they’re served more quickly to visitors).
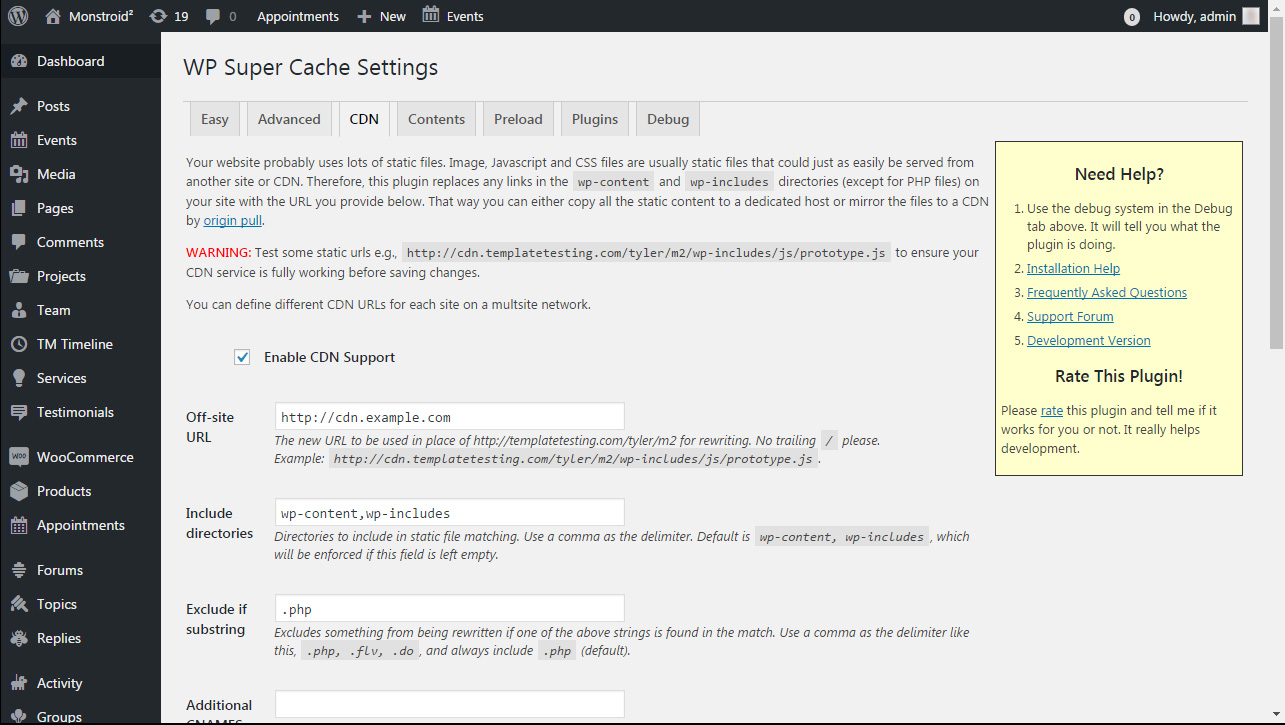
Most content sites provide a lot of static files with every page request. These files are JavaScripts, images, style files, etc. Unlike WordPress posts, which are dynamically generated by PHP, these files can be provided using Content Delivery System (CDN)(Content Delivery Network). To set up a CDN using WP Super Cache , click on the CDN tab and check the box next to ‘ Enable CDN Support‘ (Enable CDN Support). Enter your URL outside of the site, which will be your referral zone. For example, http://cdn.example.com. Then, check the box that says "Skip https links to avoid 'mixed content'" and save your changes. Your site is now ready to serve static content from the CDN.
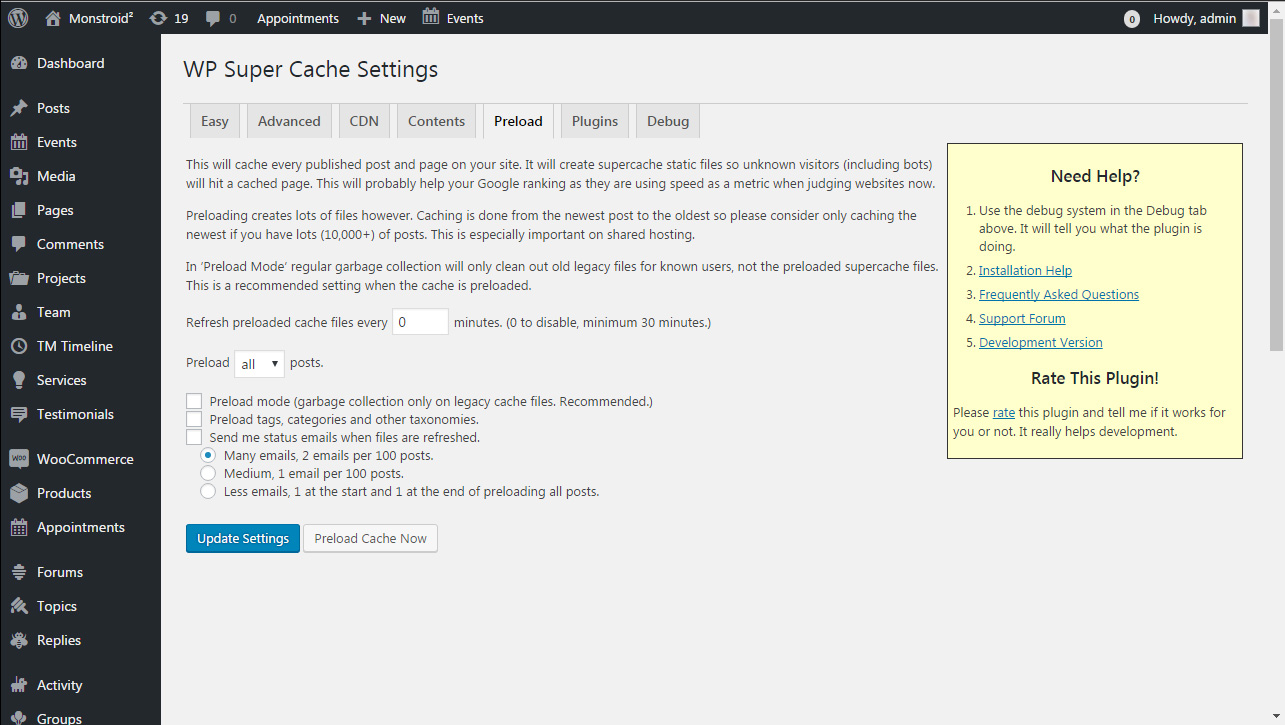
Mode preload in WP Super Cache allows you to create static super cache files for all your posts and pages and serve a static site. The cache preload settings will be zero by default, the minimum required time is at least 30 minutes. Preloading your entire WordPress site takes some time and eats up a lot of your server resources. You can leave a value 0 if you don't want your static files to expire until you refresh the cache manually.
To enable caching, go to the tab Settings(Settings) -> WP SuperCache. Enable caching in the Easy tab, and click on the "Update status" button.
Then, click on the "Test Cache" button to see if the functionality works. WP Super Cache will get your WordPress site data twice and compare timestamps in both cases. If both timestamps match, it means that caching is working on your site.
To configure WP Super Cache with advanced settings, go to the tab Settings -> WP Super Cache(Settings -> WP Super Cache ) and click on the tab Additional settings(Advanced).

That's all, now you know more about how to work with the site cache using WP SuperCache.
You can also check out the detailed video tutorial below:
WordPress. How to enable site cachingTake a closer look at the collection and choose the best one for your project.
For a long time I did not touch the topic wordpress caching, because I was sure that caching is not so important on my virtual server with SDD disks. This is exactly what the hosting support service convinced me of. Although, as she convinced, she rather warned, here is my correspondence:
I:- Tell me, with such a server configuration, does it make sense to do caching with plugins at the wordpress level?
Support: — You need to look at the situation and the load on the server.It's best not to use these plugins., your server is on an ssd disk subsystem, which is much faster than conventional disks and caching may not bring tangible results.
And recently I asked this question again and got a slightly different answer:
I:- Hello! I periodically crash ngnix and the database, I restart them and everything is fine. This happens once every 1-2 days. Tell, will installing caching plugins help me at the site level or can you do caching at the server level?
Support:— It all depends on the specifics of the problems due to which it arises. But in general yes, using caching can have a positive effect on server load.
The question is: who or what to believe? And you need to believe in experiments. I decided to install a blog on this caching plugin to see how it affects the blog.
Which WordPress caching plugin to choose?
I tried several different plugins, but I liked all the best wordpress caching plugin W3 Total Cache. Why exactly him? It's just that it is VERY functional and allows you to not only cache site pages by converting them to html files, but also much more, for example, it works and how database query caching plugin.
Of the minuses, one can note the lack of the Russian language and, in view of this, some complexity of the installation. Therefore, I decided to fix the installation process of W3 Total Cache on this site and the configuration process.
How to install W3 Total Cache?
To get started, go to the wordpress admin panel in the PLUGINS section - ADD NEW and drive in the name of the plugin in the search bar - W3 Total Cache and press ENTER.
Please note: the plugin has almost a million downloads, this figure shows that this WordPress caching plugin is actually the best! We install.
Immediately after installation, I get a warning:
 Translates as follows: W3 Total Cache Error: Files and directories could not be automatically created to complete the installation. Please run the commands manually or use the FTP form to have W3 Total Cache do it automatically.
I click Update via FTP, something happens there, the inscription disappears and this inscription appears, translated:
W3 Total Cache: Default settings are used. The configuration file could not be read or does not exist. Please click the button to create a file.
I click again and everything seems to work. If so, then you should have a folder wp-content/cache. Immediately give it and all the files in it access rights 777, otherwise it will not work. Also, for a while, you need to give the same rights to the .htaccess file in the root of the disk (better make a copy of it before that, just in case)
You may also need to give access to the /wp-config.php file or set the option in it yourself:
Define("WP_CACHE", true); // Added by W3 Total Cache
Let's go through the settings, for this we find the plugin settings in the left column of the WordPress admin panel and click on PERFOMANCER - GENERAL SETTING.
1. Page Cache - page caching
This is the most important thing for which this plugin was put. You need to check the Enable box, select the Disk: Basic method and click the Save all setting button.
 Now, when a visitor opens a page on the site, a copy of it in html format is stored in the wp-content/cache/page folder. You can also choose the ENHANCED method (increased), but I don’t know if it’s worth doing in my case. And besides, when using this method, I gave an error, although the files were cached.
2. Minify - reduction
This refers to the reduction and compression of style files and scripts. I don't enable this feature because it makes my site really skew.
 But even if there is an attempt to set it up, then there will not be much real benefit, so I won’t suffer for the time being. We go further.
3. Database Cache - database caching
And here is an important point. But don't choose the Disk: Basic method as it may cause crashes, it's better to choose the Alternative PHP Cache method. In this case, queries to the database will be cached by the PHP accelerator, which, as I understand it, is installed on the server.
 4. Object Cache - object caching
This is also a very important feature that must be enabled by selecting the Disk: Basic method.
 In this case, not only pages are cached, but also options, tags, categories, users, and much more, everything that wordpress considers necessary to cache. And judging by the quickly filled folder, you need to cache a lot. Further…
5. Browser Cache - enable browser cache
No, not your browser, the person who visits your site. This option sends a signal that the page needs to be cached, and the visitor's browser meekly complies.
 But my Google Page Speed test point blank does not want to notice this option, which I just did not do, both with and without this plugin. Most likely this happens because I have a bunch of ngnix and apache2, the first one works as a proxy server and apparently this test does not work as it should. Although, maybe I'm wrong.
6. CDN -
What is it for? You can use third party servers to cache your data. If the visitor is in America, to your main site in Russia, then it is better for him to get the bulk of the data from the CDN server, which is located in his country or somewhere nearby. But I don't enable this option yet. Why?
 Yes, because most of these services are paid. There are also free ones, but you need to search for them, study them, register and then enter the data into the plugin. The plugin itself is trying to foist us MaxCDN, which costs money, but with a 25% discount. But this is a topic for a separate article, most likely very soon I will investigate this issue and unsubscribe.
This is how I set up caching for this blog. There are some more options in the plugin, but they are not worth considering, as they are not needed in practice. If you are interested, you can dig into the settings. If you do not know English (like me), then you can use Google Crome, which can also translate the wordpress admin panel.
Caching is important for optimizing a WordPress website as it increases page loading speed. Website visitors will not like it to take a long time to load, as a result of which they may simply leave your site without waiting for information, thereby increasing the number of bounces. Such behavioral parameters have a bad effect on the ranking of the site by search engines, which lower its position in the search results. To prevent this from happening, connect the WordPress Super Cache plugin, which will automatically do the job of caching pages.

Description and features of the plugin
The cache is a temporary storage for the contents of a web page. Instead of downloading page data (such as images) from the server when you visit the site again, they will be loaded into the browser from the cache, which will significantly speed up the loading of the site. An effective caching tool for WordPress is a special WordPress Super Cache plugin.
The plugin generates static site pages and saves their cached versions on the server. After that, your hosting provider's server will "give" static files to visitors instead of each time accessing the database to get page elements.
What else can the WordPress Super Cache plugin do:
- Allows you to use a content delivery network (CDN) along with caching, redistributing the most frequently requested materials from the server closest to the visitor.
- Supports caching of page versions for tablets and smartphones.
- Uses page compression to reduce website loading time.
- Supports several types of caching.
- Provides the ability to restore the cache so that you can view cached pages even when a new cache is created.
Installing the WP Super Cache Plugin
The plugin can be found in the WordPress repository. To do this, log in to the admin panel with your username and password.
- Select the "Plugins" menu (1) and click "Add New" (2).
- Type in the name of the plugin WP Super Cache (3) in the search bar.
- Find the desired option in the list that appears and click the "Install" button (4).
- After installation, activate the plugin by clicking the appropriate button.

Even after activation, the WP Super Cache plugin is disabled by default, so you will see a warning at the top of the screen.
To enable it, follow the suggested link to the plugin management page or select the "Settings" command, which is located immediately below the plugin name.
On the settings page, you can see another notification about changing the wp-config.php file, after refreshing the page it will disappear.
To make the plugin work:
- Select the "Caching Enabled" option
- Click the Update button.
- Then check if the plug-in is connected correctly using the "Check" button.
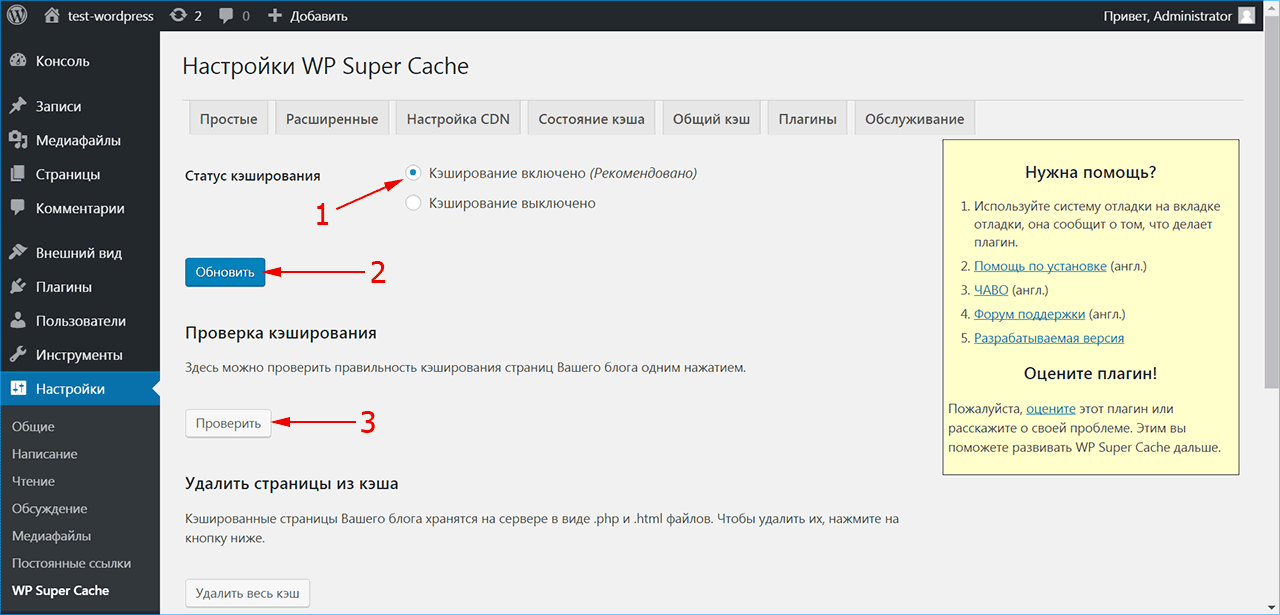
If the plugin is connected correctly, you will see an alert highlighted in green. The plugin accesses the site twice and compares the timestamps of both copies. If they match, then caching is enabled for the site.
Otherwise, the message is displayed in red and you will need to look for the cause of the problem.

WordPress Super Cache plugin settings - how to enable and configure caching
WP Super Cache is a powerful plugin with a lot of options, many of which can further improve website performance. The advanced settings panel of the plugin provides the ability to flexibly manage web page caching settings.
Make sure caching is enabled and select one of the three cache maintenance modes:
- mod_rewrite is the fastest option that allows WordPress to serve static pages from the cache without having to call the PHP interpreter on the server;
- PHP mode is used by default and consumes more resources, which can be disadvantageous in case of heavy server load;
- simplified caching is less productive than the previous options, but it will also require a minimum of resources.

The following options require configuration in the Miscellaneous section.
- The "Compress cache files" option may conflict with other compression algorithms. If there are other plugins connected to the site that provide compression, do not check this box.
- Page caching is not required for authorized users or those who leave comments on the site. Enable this option to allow such visitors to view the page in its current form.
- Automatic cache rebuilding is not needed if the site has frequently updated information. Otherwise, visitors will see outdated pages.
- A 304 error occurs when the server tells the browser that the content of the page hasn't changed since the last visit. In this case, the download occurs from the browser cache, which further speeds up the site.
- On the page with the GET parameter, there is a search by certain criteria (dates, price) specific to each visit. These pages do not need to be cached.
- If registered users are considered anonymous, cached pages will be served to everyone without exception.
- The last option in this section is to advertise the plugin with a link to the author embedded in the footer.

The "Advanced" section contains settings for advanced users. As a general rule, for regular sites, you can leave them off.
- If the site contains dynamic elements, some of them may not work correctly when caching. In this case, you will need the lightweight or PHP caching mode and the dynamic caching option enabled.
- Sites designed specifically for mobile devices will need to be enabled if the template is not responsive.
- The "Remove UTF-8 support" option is not required if all characters on the site are displayed normally.
- Clear cache files on new publications can be enabled if the site is updated frequently.
- Additional verification is needed if there are problems with the caching of any page.
- If a visitor left a comment on the page, the cache will be updated after it is moderated.
- You can view cached pages on the "Cache Status" tab, so this option is optional.
- The option slows down the work of files, preventing a possible problem on the server when caching pages.
- The developer option loads the cache only after WordPress is loaded.
Below the options is the address of the cache location and a private key in case you want to view the page without caching and without first clearing the cache.

If you have chosen the mod-rewrite method of caching pages, the plugin will ask you to update the write permissions. To do this, scroll down to the "Update Mod-Rewrite Rules" button and click it.
Then set the time and period for which the cached data on the server will be valid. Start with 3600 seconds (1 hour). If your site has a large number of articles, you may need to set a longer time, up to several days, after which the cache will be considered stale. In the same place, you can schedule cache cleaning on a schedule by setting the timer and refresh interval. For non-changing sites, garbage collection can be canceled altogether by setting the timeout value to zero.

You can prevent caching of certain information on the site (for example, a section with constantly updated information) by checking the box in the required section "Permissible names and Forbidden addresses" or manually adding page addresses.

Clear the list of search bots if you want them to get information from the cache and not load the server when crawling the site. For high-load sites with more than a thousand unique visits per day, it is recommended to enable private mode. In this case, the cache refresh will be cancelled.

On the "CDN Settings" tab, a paid service is connected for the effective distribution of information when issuing from the cache. The Cache Status tab will show which pages are being cached and can be manually removed from the list.
Click the Shared Cache tab to configure preload mode settings. Why would you want to use fully static content?
- To save server resources.
- To improve website loading speed.
- To maintain an old site whose content is no longer updated.
If you select the "Create Shared Cache Now" option, give the plugin time to generate the cache automatically. You can monitor the process by switching to the "Cache Status" tab.

The "Plugins" tab is needed only if you are going to connect other plugins that do not affect file caching.
Keep in mind, some of them only work in PHP caching mode. For specialists, the "Maintenance" tab turns on the debug mode and the option to save logs.
Using the Browser Cache, How to Clear the WordPress Cache
After a while of running the WP Super Cache plugin, you will notice the formation of a cache for the site. Properly configuring the plugin will greatly improve the loading time of the site. Cached pages are stored as HTML or PHP files on your hosting server. Usually the server knows which pages have been updated and gives the user the latest version. However, if you're having trouble displaying updated information, you can manually clear the cache. Delete cached pages from the server using the "Delete all cache" command on the control panel or by clicking on the same button in the plugin settings.

When a user visits a site for the first time, their browser accesses the remote server hosting the site. The browser request and the server response take time, given that the site elements (images, styles, scripts) are loaded sequentially one after the other. If the page contains a large number of elements or they are large in size, they may take a long time to load.
However, the user's browser is able to cache duplicate elements. This makes the site load faster, since accessing files from a hard drive is always faster than retrieving data from a remote server. Similarly, the cache clearing feature is present in every browser.
If you don't see any changes on the site that needs to be updated, clear the cache using the browser's settings control panel, or browse the page in private browsing mode (this mode does not use saved items such as passwords and cache).
Are you trying to make changes to your WordPress blog but the changes are not taking effect? For example, you just added an image, edited a theme, or corrected a mistake in the text of a blog post, but can't see the changes on the site?
This is most likely due to caching of site pages by WordPress plugins.
These plugins reduce site load times by generating cache on the server side of a WordPress blog. However, sometimes saving a copy of the site can be inconvenient, especially if you want the changes to take effect immediately.
This guide covers clearing the WordPress cache for 3 of the most popular WordPress caching plugins.
What you need
Before we begin, check for the following:
Option 1 - Clear Cache in WP Super Cache
WordPress Super Cache is the most popular caching plugin with over 1 million WordPress users. Follow these steps to clear the cache in WP Super Cache:

That's it, you have successfully deleted the cached pages.
Option 2 - Clear Cache in W3 Total Cache
W3 Total Cache is known for its convenience and variety of settings. Some popular blogs like Mashable use this caching plugin. To clear your WordPress site's cache in W3 Total Cache, follow these steps:

Great, you have just successfully cleared the cache created by the W3 Total Cache plugin.
Option 3 – Clear Cache in WP Fastest Cache
WP Fastest Cache is a simple and easy to use caching plugin. Follow the steps below to clear the cache in WP Fastest Cache:

That's it, you have successfully deleted the cached files.
Summary
Caching plugins for WordPress are a good way to speed up your website. However, an outdated cache may cause some inconvenience to your visitors. After going through this guide, you will be introduced to clearing the cache for three popular WordPress caching plugins. If after clearing the cache you still don't see changes in your WordPress blog, try also
Previous article: Web Security Space Life (Perpetual license) for android Next article: Recovery of SD cards and USB flash drives in Windows environment